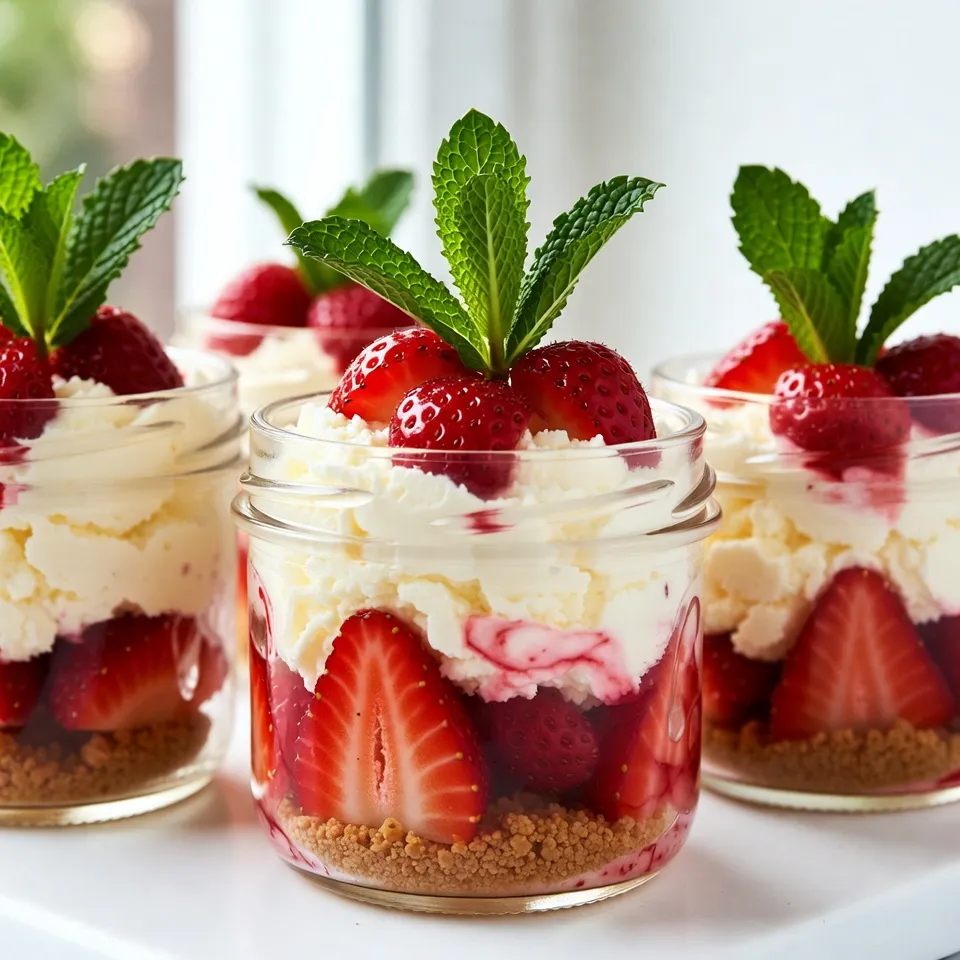
Get ready to indulge in a delightful treat with my Strawberry Cheesecake Jars—a no-bake dessert that’s perfect for any occasion! It’s simple to make and packed with flavor. In this guide, I’ll walk you through everything, from ingredients to tips for the perfect cheesecake. Whether you’re a beginner or a seasoned pro, these jars will impress your friends and family. Let’s dive in and create a sweet masterpiece!
Why I Love This Recipe
- Easy to Make: This recipe is simple and requires no baking, making it perfect for all skill levels.
- Fresh Ingredients: Using fresh strawberries adds vibrant flavor and a beautiful presentation to each jar.
- Perfect for Any Occasion: These cheesecake jars are great for parties, picnics, or just a sweet treat at home.
- Individual Servings: The jar presentation makes it easy to serve and enjoy a personal portion of dessert.
Ingredients
List of Ingredients
To make these tasty strawberry cheesecake jars, you need:
– 1 cup crushed graham crackers
– ¼ cup unsalted butter, melted
– 8 oz cream cheese, softened
– ½ cup powdered sugar
– 1 teaspoon vanilla extract
– 1 cup whipped cream (or whipped topping)
– 2 cups fresh strawberries, hulled and sliced
– 2 tablespoons sugar (for strawberries)
– Fresh mint leaves for garnish (optional)
Optional Ingredients for Customization
You can add extra flavors to make your jars unique. Try these options:
– A splash of lemon juice for zest
– A dash of almond extract for nutty flavor
– Chocolate chips for a sweet crunch
– A layer of other fruits like blueberries or raspberries
Substitutions for Common Allergens
If you have allergies, here are some swaps:
– Use gluten-free graham crackers for a gluten-free base.
– Swap cream cheese with a dairy-free cream cheese for a vegan option.
– Replace powdered sugar with coconut sugar for a healthier sweetener.
– Use a dairy-free whipped topping if you want to avoid dairy.

Step-by-Step Instructions
Preparing the Strawberry Layer
To start, grab a bowl. Place the sliced strawberries in it. Sprinkle 2 tablespoons of sugar over them. Gently toss the strawberries. Let them sit for 10-15 minutes. This will help draw out their juices. You’ll notice them getting syrupy. The sweet, juicy strawberries will add great flavor to your jars.
Making the Graham Cracker Base
Next, take a medium bowl. Mix the crushed graham crackers with the melted butter. Make sure they combine well. This mixture serves as the crust for your cheesecake jars. It will add a nice crunch. Press it down a bit at the bottom of each jar. This step is key for a sturdy base.
Creating the Cheesecake Mixture
Now, move to a large bowl. Beat the softened cream cheese using an electric mixer. Mix until it becomes creamy and smooth. Add the powdered sugar and vanilla extract next. Keep mixing until there are no lumps. Finally, fold in the whipped cream gently. This will make your cheesecake light and fluffy.
Assembling the Jars
Time to layer! Start with about 2 tablespoons of the graham cracker crust. Place it at the bottom of each jar. Then, add a big scoop of the cheesecake mixture. Follow this with a layer of those sweet strawberries. You can repeat these layers until the jars are full. Finish with a few strawberries on top for a pretty look.
Chilling Before Serving
After assembling, it’s time to chill. Put the jars in the refrigerator. Let them sit for at least 2 hours. If you have time, leaving them overnight is even better. This step allows all the flavors to blend. It also helps the cheesecake set perfectly. Before serving, you can add a fresh mint leaf on top for a nice touch.
Tips & Tricks
How to Layer for Visual Appeal
To make your jars look great, start with the crust. Use about 2 tablespoons of crushed graham crackers. Press it down gently to form a solid base. Next, add a layer of cheesecake mixture. Use a spoon to create a smooth top. Then, layer the macerated strawberries. This contrast of colors is key. Repeat the layers until you reach the top. Finish with a beautiful layer of strawberries. A mint leaf on top adds a nice touch.
Ensuring the Cheesecake Mixture is Smooth
To get a smooth cheesecake mixture, soften the cream cheese well. Beat it first before adding sugar. Mix until it looks creamy and fluffy. Then, add the powdered sugar and vanilla extract slowly. This helps to prevent lumps. Finally, fold in the whipped cream gently. This keeps it light and airy. Avoid over-mixing at this stage. The goal is a creamy, smooth texture that will impress everyone.
Best Practices for Macerating Strawberries
Macerating strawberries is easy and fun. Start by hulling and slicing them. Put the slices in a bowl. Sprinkle 2 tablespoons of sugar over the strawberries. Toss them gently to coat. Let them sit for 10-15 minutes. This draws out their natural juices. The result is sweet, juicy strawberries full of flavor. Use them right away or let them chill in the fridge. This step enhances the taste of your cheesecake jars.
Pro Tips
- Use Fresh Strawberries: For the best flavor and texture, make sure to use ripe, fresh strawberries. They should be sweet and juicy to complement the creamy cheesecake.
- Chill the Jars: Allow the cheesecake jars to chill for at least 2 hours, or overnight if possible. This helps the layers set properly and enhances the flavors.
- Customize the Layers: Feel free to experiment with different fruits or toppings. Blueberries, raspberries, or even a drizzle of chocolate can add a unique twist to your jars.
- Use a Piping Bag: For a more professional look, use a piping bag to layer the cheesecake mixture in the jars. This will create clean, even layers and make assembly easier.
Variations
No-Bake Strawberry Cheesecake Jars
Making no-bake strawberry cheesecake jars is simple and fun. You need the same ingredients. Just skip the oven! The cold layers of cheesecake, strawberries, and crust are a treat. This no-bake method keeps it easy and quick. Just chill the jars before serving. You will love how fresh and creamy they taste.
Vegan Strawberry Cheesecake Version
For a vegan twist, use dairy-free cream cheese. You can find it at most stores. Substitute whipped cream with coconut cream for a rich taste. Use maple syrup instead of powdered sugar. The sweetness will shine through with fresh strawberries. This vegan version tastes just as good and is perfect for everyone.
Alternative Fruit Combinations
While strawberries are classic, feel free to mix it up! Try blueberries, raspberries, or peaches. Each fruit adds its own flavor and color. You can even create a mixed fruit jar. Layer different fruits in each jar to make it fun and colorful. Your guests will appreciate the variety and freshness.
Storage Info
How to Store Leftover Cheesecake Jars
You can store leftover cheesecake jars in your fridge. Use an airtight container to keep them fresh. They will stay good for about three days. If you have not eaten them all, make sure to seal them well. This helps keep the flavors strong.
Freezing Instructions
If you want to save some for later, you can freeze the jars. First, cover each jar tightly with plastic wrap. Then, place them in a freezer-safe bag. They can last up to two months in the freezer. When you are ready to eat, just take them out and let them thaw in the fridge overnight.
Best Practices to Maintain Freshness
To keep your jars fresh, always use clean utensils when serving. This prevents any bacteria from spoiling the cheesecake. If you notice any liquid forming in the jars, gently stir the mixture before serving. This helps to keep the texture nice and creamy. Enjoy your delicious treats!
FAQs
Can I make strawberry cheesecake jars in advance?
Yes, you can make these jars ahead of time. Prepare them up to two days in advance. Store them in the fridge. This allows the flavors to blend nicely.
What can I use instead of cream cheese?
You can use ricotta cheese or Greek yogurt. Both will give a creamy texture. They may change the flavor slightly but will still taste great.
How long do the jars last in the fridge?
The jars can last up to four days in the fridge. Make sure to cover them well. This keeps them fresh and tasty.
Can I use frozen strawberries instead of fresh?
Yes, frozen strawberries work too! Thaw them and drain excess juice. They may be softer but still taste delicious.
Is it possible to make individual cheesecake cups instead of jars?
Absolutely! You can use small cups or ramekins. Layer the ingredients just like in the jars. Each cup will be a perfect single serving.
This blog post covered how to make strawberry cheesecake jars from start to finish. We looked at the key ingredients, step-by-step instructions, and tips for great results. I shared variations, storage tips, and answered common questions.
Making these cheesecake jars is fun and simple. Enjoy customizing and sharing them. You can impress friends and family with your tasty creation. I hope you try it and enjoy every bit