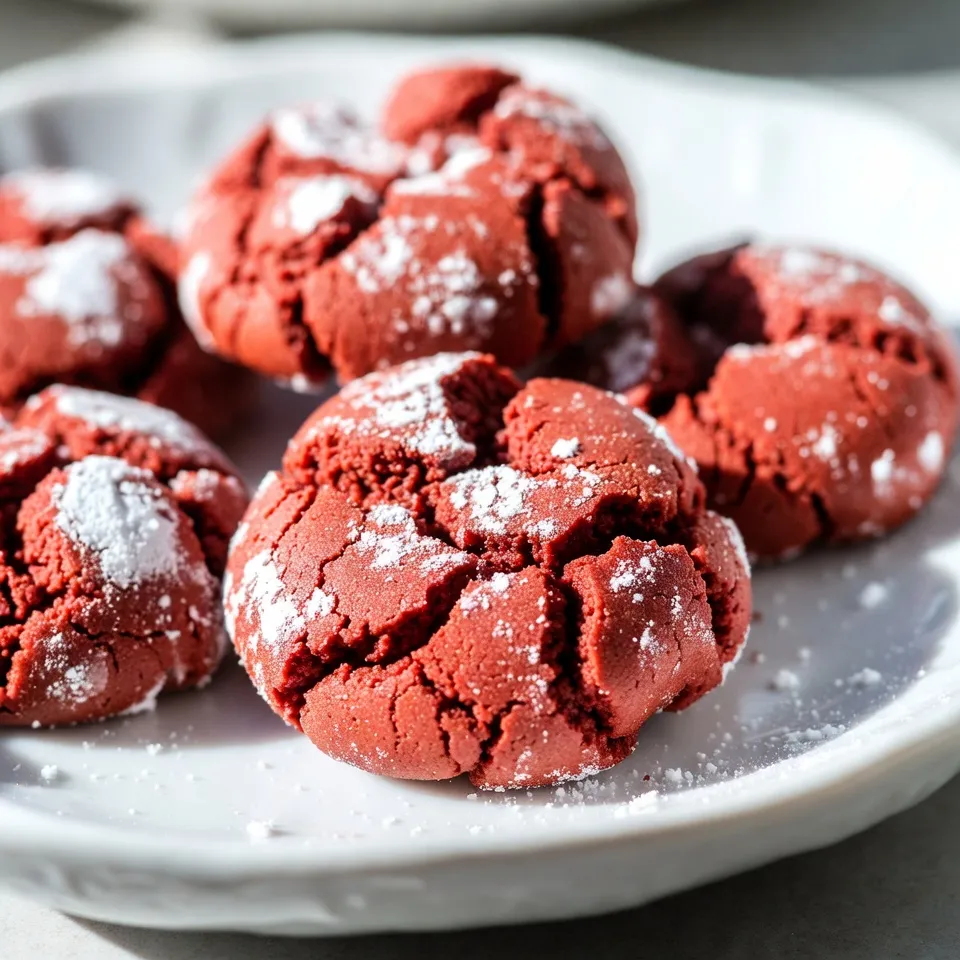
Are you ready to bake the softest, most delightful Red Velvet Crinkle Cookies? These treats are not just a feast for the eyes but also a dream for your taste buds. With a rich flavor and that perfect crinkle, they’re sure to impress. In this guide, I’ll share all the ingredients, step-by-step baking instructions, and tips to ensure your cookies turn out perfectly every time. Let’s get started on this tasty adventure!
Why I Love This Recipe
- Deliciously Unique Flavor: The combination of cocoa and red food coloring gives these cookies a rich, indulgent flavor that is both nostalgic and festive.
- Easy to Make: With simple ingredients and straightforward steps, these cookies are perfect for bakers of all skill levels.
- Visually Stunning: The striking red color contrasted with the powdered sugar coating makes these cookies a beautiful addition to any dessert table.
- Perfect for Any Occasion: Whether it’s a holiday gathering or a casual get-together, these cookies are sure to impress and delight your guests.
Ingredients
List of Essential Ingredients
– 2 cups all-purpose flour
– 1 tablespoon cocoa powder
– 1 teaspoon baking powder
– 1/2 teaspoon baking soda
– 1/4 teaspoon salt
– 1/2 cup unsalted butter, softened
– 1 cup granulated sugar
– 1 large egg
– 1 teaspoon vanilla extract
To create delicious Red Velvet Crinkle Cookies, you need a few key ingredients. The all-purpose flour gives the cookies structure. Cocoa powder adds that hint of chocolate flavor. Baking powder and baking soda help them rise and create a nice texture. Salt enhances all the sweet flavors.
You also need butter, which makes the cookies rich and soft. Granulated sugar sweetens the dough perfectly. The egg binds everything together and helps keep the cookies moist. Lastly, vanilla extract brings a warm, comforting flavor to each bite.
Optional Ingredients
– 1 tablespoon red food coloring
– 1/2 cup powdered sugar (for rolling)
Red food coloring is what gives these cookies their stunning color. It makes them look festive and fun. You can add more or less based on how vibrant you want them.
For serving, I suggest a light dusting of powdered sugar. It creates a beautiful snowy effect on the red cookies. You can also pair these cookies with a glass of milk or a scoop of vanilla ice cream for a tasty treat. Enjoy!

Step-by-Step Instructions
Preparation Steps
1. Preheat the oven: Set your oven to 350°F (175°C). This heat helps the cookies bake evenly and rise well.
2. Prep baking sheets: Line two baking sheets with parchment paper. This keeps your cookies from sticking and makes cleanup easy.
3. Mix dry ingredients: In a medium bowl, whisk together these dry items:
– 2 cups all-purpose flour
– 1 tablespoon cocoa powder
– 1 teaspoon baking powder
– 1/2 teaspoon baking soda
– 1/4 teaspoon salt
Set this bowl aside for later use.
4. Incorporate wet ingredients: In a large bowl, cream together:
– 1/2 cup unsalted butter, softened
– 1 cup granulated sugar
Mix until light and fluffy, about 3-5 minutes. Then, beat in:
– 1 large egg
– 1 tablespoon red food coloring
– 1 teaspoon vanilla extract
Mix until everything is well combined.
5. Combine mixtures: Gradually mix the dry ingredients into the wet mixture. Stir until just combined. Avoid over-mixing; this keeps your cookies soft.
Chilling and Baking the Cookies
1. Chill the dough: Cover the dough and refrigerate it for at least 30 minutes. Chilling the dough helps it firm up, making it easier to shape and gives better texture.
2. Rolling the cookies: After chilling, scoop tablespoons of dough and roll them into balls.
3. Coat in powdered sugar: Place 1/2 cup powdered sugar in a shallow dish. Roll each ball in the sugar until fully coated.
4. Bake the cookies: Place the dough balls on the prepared baking sheets, spacing them about 2 inches apart. Bake for 10-12 minutes. The edges should be set, while the centers remain soft.
5. Cooling: Once baked, let the cookies sit on the baking sheets for 5 minutes. Then, transfer them to a wire rack to cool completely. This step is key for perfect texture.
Tips & Tricks
Baking Techniques for Perfect Cookies
– Creaming butter and sugar effectively: Start with softened butter. Use a mixer on medium speed. Mix for about 3-5 minutes until the mix is light and fluffy. This step adds air to your cookies, making them soft.
– Preventing over-mixing the dough: Combine the dry ingredients with the wet mixture slowly. Stop mixing as soon as you see no dry flour. Over-mixing can make cookies tough. You want a nice, soft dough for perfect crinkles.
Common Mistakes to Avoid
– Tips for proper dough chilling: Chill your dough for at least 30 minutes. This helps the cookies hold their shape. If the dough is too warm, they will spread too much when baking.
– Baking time adjustments based on oven variations: Ovens can vary in temperature. Start checking your cookies at 10 minutes. If the edges look set and the centers are soft, they are ready. Overbaking can lead to hard cookies, so keep an eye on them!
Pro Tips
- Chill the Dough: Refrigerating the dough helps the cookies maintain their shape while baking and enhances their chewy texture.
- Use Gel Food Coloring: For a more vibrant red color, opt for gel food coloring instead of liquid. It provides a richer hue without adding extra moisture.
- Don’t Overbake: To achieve a soft and chewy center, take the cookies out of the oven when the edges are set but the centers are still slightly underbaked.
- Store Properly: Keep the cooled cookies in an airtight container at room temperature to maintain their freshness for up to a week.
Variations
Flavor Enhancements
You can change up your Red Velvet Crinkle Cookies easily. One great option is to add chocolate chips. They bring a rich flavor and extra sweetness. Just fold in about a cup of chocolate chips when mixing your dough. The melty chocolate pairs well with the soft cookie.
Another fun idea is to incorporate nuts or sprinkles. Chopped walnuts or pecans add a nice crunch. If you want a festive touch, mix in some colorful sprinkles. They not only look fun but also add a slight crunch and sweetness.
Dietary Modifications
If you need gluten-free cookies, you can swap the all-purpose flour. Use a gluten-free flour blend instead. Make sure it has a good mix of starches and flours for the best results. This way, everyone can enjoy these soft treats.
For a vegan option, replace the butter and egg. You can use coconut oil instead of butter. For the egg, try using a flaxseed egg. Mix one tablespoon of ground flaxseed with three tablespoons of water. Let it sit for a few minutes to thicken. This keeps the cookies soft while making them vegan-friendly.
Storage Info
Best Practices for Cookie Storage
To keep your Red Velvet Crinkle Cookies fresh, store them in an airtight container. This helps prevent them from drying out. You can layer parchment paper between the cookies. This way, they won’t stick together.
If you want to freeze them for later, here is what to do:
– Let the cookies cool completely.
– Place them in a single layer on a baking sheet.
– Freeze them for about 1 hour.
– Once frozen, transfer the cookies to a freezer-safe bag.
This method keeps them fresh for up to three months. When you want to enjoy them, just thaw at room temperature.
Shelf Life
Cookies do not last forever. They start to change after a few days.
– Freshly baked Red Velvet Crinkle Cookies taste best within 3 days.
– After about a week, they may become stale.
Here are signs of spoilage to watch for:
– A hard texture means they are stale.
– If they smell off, it’s best to throw them away.
– Any visible mold is a clear sign they should not be eaten.
Storing cookies properly keeps them tasty and soft. Enjoying them at their best makes all the difference!
FAQs
Common Questions about Red Velvet Crinkle Cookies
Why are my red velvet cookies not crinkling?
Your cookies may not crinkle for a few reasons. First, the dough might be too warm. Chilling the dough helps it hold shape. If the dough is too soft, it won’t create that crinkle. Second, not using enough powdered sugar can also affect the crinkle. Make sure you coat each ball well before baking.
Can I use liquid food coloring instead of gel?
Yes, you can use liquid food coloring, but the result may be different. Gel food coloring gives a richer color with less liquid. Liquid coloring can change the dough’s consistency and may lead to a lighter color. If you use liquid, add it slowly to avoid making the dough too wet.
Tips for Better Baking
How to get that rich red color in cookies?
To achieve a bright red color, use a high-quality gel food coloring. Start with one tablespoon, but feel free to add more if needed. Mix it well into your wet ingredients. The color will be more vibrant when baked, so don’t worry if it looks light before baking.
Can I use a different type of sugar?
You can use brown sugar instead of granulated sugar. Brown sugar adds moisture and a slight caramel flavor. However, it may change the texture slightly, making the cookies chewier. If you want a lighter taste, stick with granulated sugar.
You now understand the key ingredients and steps for making delicious Red Velvet Crinkle Cookies. Remember to chill the dough for great texture and crinkle effect. Use optional ingredients for fun variations, and consider dietary needs, too. Store cookies properly to keep them fresh. With these tips, you can bake cookies that impress everyone. Enjoy your baking adventure and share your tasty creations with friend