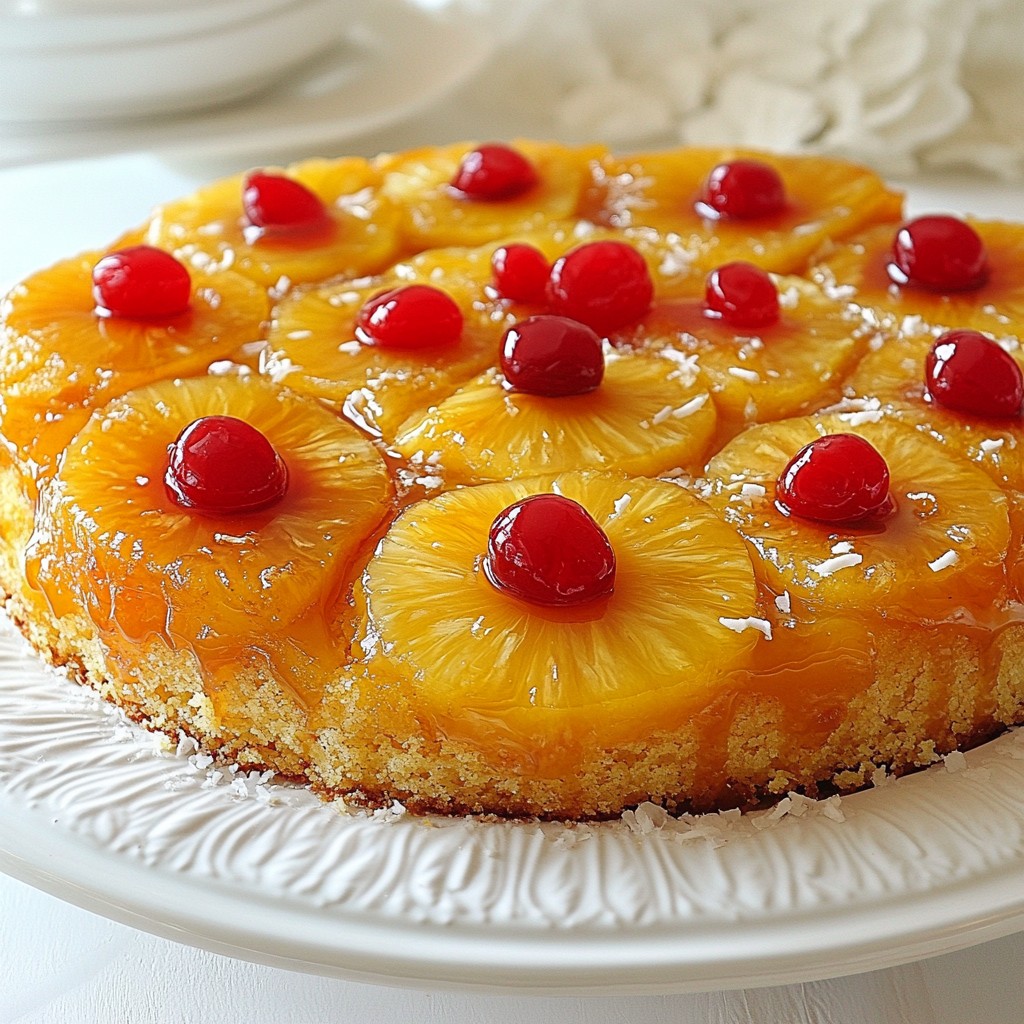
Ready for a treat that bursts with tropical flavor? Dive into making a Pineapple Coconut Upside-Down Cake! This simple delight combines sweet pineapple, rich coconut, and cherries for a stunning dessert. Whether you're a baking newbie or a seasoned pro, I’ll guide you step-by-step. Get your ingredients, and let’s whip up this delightful cake that’s perfect for any occasion! Trust me, you’ll want to savor every bite!
Why I Love This Recipe
- Deliciously Tropical: This cake transports you to a sunny paradise with its vibrant flavors of pineapple and coconut.
- Easy to Make: With simple ingredients and straightforward steps, this recipe is perfect for bakers of all levels.
- Impressive Presentation: The beautiful caramelized pineapple topping makes for an eye-catching dessert that will wow your guests.
- Perfect for Any Occasion: This cake is versatile, making it ideal for birthdays, potlucks, or just a sweet treat at home.
Ingredients
To make a delicious Pineapple Coconut Upside-Down Cake, you need the right ingredients. Here’s what you’ll need:
- 1 cup brown sugar
- 1/4 cup unsalted butter
- 1 can (20 oz) sliced pineapple in juice, drained and juice reserved
- Maraschino cherries for garnish
- 1 1/2 cups all-purpose flour
- 1 cup granulated sugar
- 1/2 cup unsweetened coconut milk
- 1/2 cup unsweetened shredded coconut
- 1/2 cup vegetable oil
- 3 large eggs
- 1 teaspoon baking powder
- 1/2 teaspoon baking soda
- 1 teaspoon vanilla extract
- 1/4 teaspoon salt
You can also try some optional ingredients for fun twists:
- Add a handful of chopped nuts for crunch.
- Use fresh pineapple if you want a bright flavor.
- Swap in a different extract, like almond, for a new taste.
Gather these ingredients, and you'll be ready to bake a cake that everyone will love!

Step-by-Step Instructions
Preparing the Pineapple Base
Start by melting 1/4 cup of unsalted butter in a small saucepan over medium heat. Once the butter melts, add 1 cup of brown sugar. Stir until the sugar dissolves. Remove the pan from heat.
Next, pour this mixture into a 9-inch round cake pan. Make sure it covers the bottom evenly. Now, take the drained sliced pineapple and arrange it on top of the brown sugar mixture. Place a maraschino cherry in the center of each pineapple slice. This adds a bright touch and looks great!
Making the Cake Batter
In a large mixing bowl, whisk together 1 1/2 cups of all-purpose flour, 1 cup of granulated sugar, 1 teaspoon of baking powder, 1/2 teaspoon of baking soda, and 1/4 teaspoon of salt. This mix creates the base of your cake.
In another bowl, combine 1/2 cup of unsweetened coconut milk, 1/2 cup of vegetable oil, 3 large eggs, and 1 teaspoon of vanilla extract. Mix these wet ingredients until they are well combined.
Now, gradually add the wet mixture to the dry ingredients. Mix just until combined. Avoid over-mixing to keep the cake light and fluffy. Finally, gently fold in 1/2 cup of unsweetened shredded coconut. This coconut will add flavor and texture to the cake.
Baking the Cake
Pour the batter carefully over the arranged pineapple and cherries in the cake pan. Bake in your preheated oven at 350°F (175°C) for 40 to 45 minutes. To check if the cake is done, insert a toothpick into the center. It should come out clean when the cake is ready!
Once done, let the cake cool in the pan for about 10 minutes. Then, invert the cake onto a serving plate. Ensure the pineapple layer is on top. Let it cool completely before slicing and serving. Enjoy the tropical flavors of this delightful cake!
Tips & Tricks
Baking Tips
How to prevent over-mixing To avoid over-mixing, mix slowly. Combine wet and dry ingredients just until moist. Lumps are okay. They help keep the cake light and fluffy.
Using fresh versus canned pineapple Fresh pineapple adds a bright taste. It also provides a firmer texture. Canned pineapple is easy and sweet. Use what you have on hand. Just make sure to drain the juice well.
Presentation Suggestions
Garnishing with shredded coconut Sprinkle shredded coconut on top before serving. It adds a lovely touch. It also gives a nice crunch. This small step makes your cake look fancy and fun.
Serving suggestions with whipped coconut cream Serve each slice with a dollop of whipped coconut cream. This adds richness. It balances the sweetness of the cake. This makes each bite feel like a tropical vacation.
Pro Tips
- Use Fresh Pineapple: For an even more vibrant flavor, consider using fresh pineapple instead of canned. It enhances the cake’s tropical essence.
- Don’t Overmix: When combining wet and dry ingredients, mix just until combined. Overmixing can lead to a dense cake.
- Cool Before Inverting: Let the cake cool in the pan for a few minutes before inverting. This helps prevent the topping from sticking to the pan.
- Enhance Coconut Flavor: For an extra coconut kick, toast the shredded coconut before adding it to the batter. This will deepen its flavor.
Variations
Flavor Variations
You can change up this cake easily. For a tropical twist, try adding other fruits. Sliced mango or fresh berries can add a new taste. You can also mix in different types of coconut milk. Try flavored coconut milk like vanilla or even chocolate for a fun change. Extracts like almond or rum can also bring a unique flavor. Use your imagination to create a cake that fits your taste!
Dietary Variations
If you need a gluten-free cake, swap out all-purpose flour for a gluten-free blend. Many blends work well, so pick one you like. For those who want a vegan option, replace the eggs with flax eggs. To make a flax egg, mix one tablespoon of ground flaxseed with three tablespoons of water. Let it sit until thick. For milk, use almond milk or soy milk in place of regular milk. These changes keep the cake moist and delicious!
Storage Info
How to Store Leftovers
To keep your Pineapple Coconut Upside-Down Cake fresh, store it properly. First, let the cake cool completely. Wrap the cake in plastic wrap or foil. This keeps it moist and tasty. If you have a cake dome, use that too. It works great for short-term storage. Place the wrapped cake in the fridge. It stays good for up to five days.
Freezing Instructions
You can freeze this cake for longer storage. First, let it cool all the way. Then, slice the cake into pieces. Wrap each piece in plastic wrap. For added protection, place the wrapped pieces in a freezer bag. Make sure to remove as much air as possible. This helps avoid freezer burn. The cake stays fresh for up to three months.
When you’re ready to eat, take a piece out of the freezer. Place it in the fridge overnight to thaw. If you want it faster, let it sit at room temperature for a few hours. Reheat in the oven at a low temperature to restore its texture. Enjoy your cake, just like the day you baked it!
FAQs
Can I use fresh pineapple instead of canned?
Yes, you can use fresh pineapple! Fresh pineapple will add a bright flavor. To prepare, peel and slice the pineapple into rings. You can use the same amount as canned. Make sure to drain the juice well before placing the rings in the pan for best results.
How do I know when the cake is done baking?
To tell if the cake is done, use a toothpick. Insert it into the center of the cake. If it comes out clean, the cake is ready. You should also look for a golden color on top and the cake should pull slightly away from the pan edges.
What other toppings can I use besides cherries?
You can try other fruits like sliced strawberries or peaches. You could also use nuts, like chopped pecans or walnuts, for added crunch. For a fun twist, consider adding a drizzle of chocolate or a sprinkle of extra coconut on top.
In this article, we explored making a delicious pineapple upside-down cake. You learned about the essential ingredients, step-by-step instructions, and helpful tips for baking. We also covered tasty variations and proper storage methods. Remember, using fresh ingredients and following the steps can make a big difference. Feel free to experiment with flavors! Enjoy your baking journey and share this delightful treat with others. A slice of joy awaits!