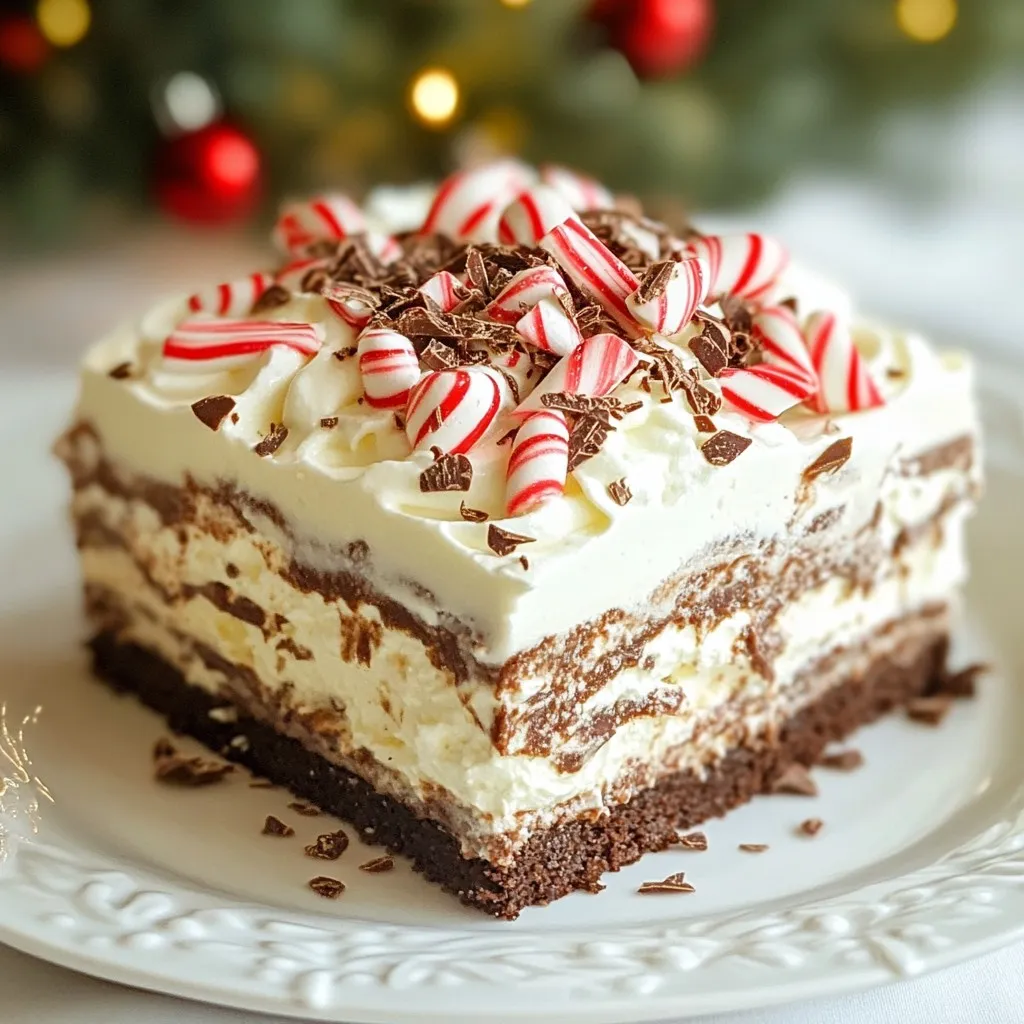
Craving a cold treat that combines rich chocolate and refreshing peppermint? Look no further! My Peppermint Chocolate Icebox Cake is an easy, no-bake delight perfect for warm days and festive gatherings. With creamy layers and crunchy textures, this dessert will impress your family and friends. Get ready to whip up a delicious treat that cools your taste buds and satisfies your sweet tooth. Let’s dive into the recipe!
Why I Love This Recipe
- Festive Flavor: This cake perfectly combines the rich taste of chocolate with the refreshing zing of peppermint, making it a delightful holiday treat.
- Easy Preparation: With minimal steps and no baking required, this recipe is perfect for busy holiday schedules.
- Make Ahead: Chilling the cake overnight enhances the flavors and makes it a convenient dessert option for gatherings.
- Customizable Touch: Feel free to get creative with garnishes, using chocolate shavings or extra peppermint candies for a personal flair.
Ingredients
Complete List of Ingredients
– 2 cups heavy whipping cream
– 1 cup powdered sugar
– 1 teaspoon vanilla extract
– 1 teaspoon peppermint extract
– 20-24 chocolate wafer cookies
– 1 cup crushed peppermint candies
– 1 cup chocolate shavings (optional)
To create the perfect Peppermint Chocolate Icebox Cake, you need a simple yet delightful mix of ingredients. Heavy whipping cream is the base, giving our dessert its rich and creamy texture. The powdered sugar sweetens it just right. Vanilla and peppermint extracts add layers of flavor that make this cake truly special.
Chocolate wafer cookies are essential. They provide a nice crunch that contrasts with the smooth cream. Crushed peppermint candies give a fun, festive touch. If you want to impress, chocolate shavings can be a lovely garnish. They add elegance and a bit of extra chocolate flavor.
Gather these ingredients before you start. Having everything ready makes the process smooth and enjoyable. Trust me, once you see this cake come together, you’ll be excited to share it with friends and family.

Step-by-Step Instructions
Preparation of the Cream
To start, gather your ingredients. In a large mixing bowl, combine 2 cups of heavy whipping cream, 1 cup of powdered sugar, 1 teaspoon of vanilla extract, and 1 teaspoon of peppermint extract. This mix brings a sweet and minty flavor.
Next, use an electric mixer to whip the cream. Mix on high speed for about 3 to 5 minutes. You want to whip until stiff peaks form. This means the cream holds its shape and is perfect for layering.
Layering the Cake
Now, grab a 9×5 inch loaf pan. Begin by spreading a thin layer of the whipped cream mixture at the bottom. This layer helps the cookies stick.
Then, take 20 to 24 chocolate wafer cookies. Arrange them over the whipped cream, covering the entire base. The cookies will add a rich chocolate taste.
After that, spread another layer of whipped cream over the cookies. Don’t forget to sprinkle some crushed peppermint candies on top. This adds a nice crunch and more minty flavor.
Continue layering with more cookies, followed by whipped cream and crushed candy. Keep going until you use all your ingredients. Finish with a final layer of whipped cream on top.
Chilling the Cake
Once you have layered everything, cover the pan with plastic wrap. This keeps moisture in and helps set the cake. Place it in the refrigerator for at least 4 hours. If you can, chill it overnight. This gives the cookies time to soften and the flavors to blend well.
Final Touches
After chilling, it’s time to remove the cake from the pan. Carefully flip it onto a plate. If you want, you can top it with chocolate shavings or more crushed peppermint candies. This makes it look festive and fun. Slice and serve to enjoy your delicious peppermint chocolate icebox cake!
Tips & Tricks
Tips for Perfect Whipping
– Achieving stiff peaks: To get stiff peaks, start with cold heavy cream. Chill your mixing bowl and beaters. Whip the cream on medium-high speed until it thickens. Keep going until you see peaks that stand tall. This will take about 3-5 minutes.
– Best mixing techniques: Use an electric mixer for best results. If you don’t have one, a whisk works, but it takes longer. Start slow to avoid splatters, then increase speed to mix well.
Layering Suggestions
– Adjusting layers for preferred texture: You can change the number of layers based on your taste. For a creamier cake, add more whipped cream between the layers. If you prefer a crunch, keep the layers fewer.
– Alternatives to chocolate wafer cookies: If you want a twist, try using graham crackers or chocolate chip cookies. They will add different flavors while still giving that nice texture.
Presentation Tips
– Serving suggestions: Serve slices on colorful dessert plates to brighten your table. For a fun touch, add a sprig of fresh mint on top. This adds a pop of color and a hint of freshness.
– Garnishes for festive occasions: Use chocolate shavings or extra crushed peppermint candies as a garnish. These small touches make your cake look special and festive.
Pro Tips
- Chill Your Bowl: For the best whipped cream, chill your mixing bowl and beaters in the refrigerator for about 15 minutes before whipping. This helps the cream whip faster and increases volume.
- Choose the Right Cookies: Chocolate wafer cookies are ideal for this recipe, but you can also substitute with dark chocolate graham crackers for a richer flavor.
- Layering Technique: When layering, press down gently on the cookies after adding each layer of whipped cream to help them absorb moisture evenly and prevent a soggy texture.
- Make Ahead: This icebox cake tastes even better the next day! Prepare it a day in advance to allow the flavors to deepen and the texture to improve.
Variations
Alternative Flavorings
You can change the flavor of your peppermint chocolate icebox cake. Try using other extracts like almond or orange. These flavors can add a new twist. Mixing in ingredients like coffee or chocolate liqueur will also enhance the taste. A little espresso powder adds a nice depth.
Different Types of Cookies
You can swap out chocolate wafer cookies for other types. Consider using gluten-free cookies for a gluten-free option. Options like gingersnaps or vanilla wafers can also work well. Experimenting with different cookie flavors can create fun variations. Try mint cookies for more peppermint flavor or chocolate chip cookies for a twist.
Healthier Swaps
If you want to make a healthier version, consider reducing the sugar content. You can use less powdered sugar in the whipped cream. Another option is to use a sugar substitute, like stevia or monk fruit. For a lower-fat version, consider using light whipping cream instead of heavy cream. These swaps maintain the taste while cutting some calories.
Storage Info
Best Storage Practices
To keep your peppermint chocolate icebox cake fresh, cover it well. Use plastic wrap or foil to seal the pan tightly. This helps prevent any odors from your fridge from seeping in. Store the cake in the refrigerator. It will stay fresh for about 3 to 4 days. The flavors will deepen as it sits, making it even better!
Freezing Guidelines
If you want to save some for later, you can freeze the cake. First, make sure it is well-covered. Use plastic wrap and then aluminum foil to keep it safe from freezer burn. You can freeze the cake for up to 2 months. When you’re ready to eat it, move it to the fridge for a few hours or overnight to thaw. Avoid using a microwave, as it can ruin the texture. Enjoy your chilled delight whenever you like!
FAQs
Can I make this dessert in advance?
Yes, you can make this dessert in advance. I recommend preparing it the night before. This gives the cake time to chill and the flavors to blend well. The longer it sits, the better it tastes. Just remember to cover it tightly with plastic wrap.
What can I substitute for heavy cream?
If you need a substitute for heavy cream, there are a few options. Here are some alternatives for different diets:
– Coconut Cream: Great for dairy-free diets. Use it as a one-to-one swap.
– Silken Tofu: Blend it until smooth for a low-fat option. Use equal amounts.
– Greek Yogurt: For a tangy twist, mix it with a bit of milk. Use half the amount of yogurt and add milk until smooth.
How do I cut the cake for serving?
Cutting the cake can be tricky. Here’s how to get clean slices:
– Technique: Use a sharp knife and wipe it clean after each cut. This keeps the edges neat.
– Tools: A serrated knife works best. It easily cuts through the soft layers without squishing them. You can also use a cake server for lifting slices.
This dessert brings together rich flavors and textures in a fun way. You learned how to whip the cream, layer the cake, and chill it for the best taste. Remember the tips for achieving perfect peaks and creative variations to make it your own. Trust me; practice makes perfect. Enjoy experimenting with different flavors and sharing this treat with others. With the right storage, you can savor this dessert longer. So, get ready to impress your friends and family with your new baking skill