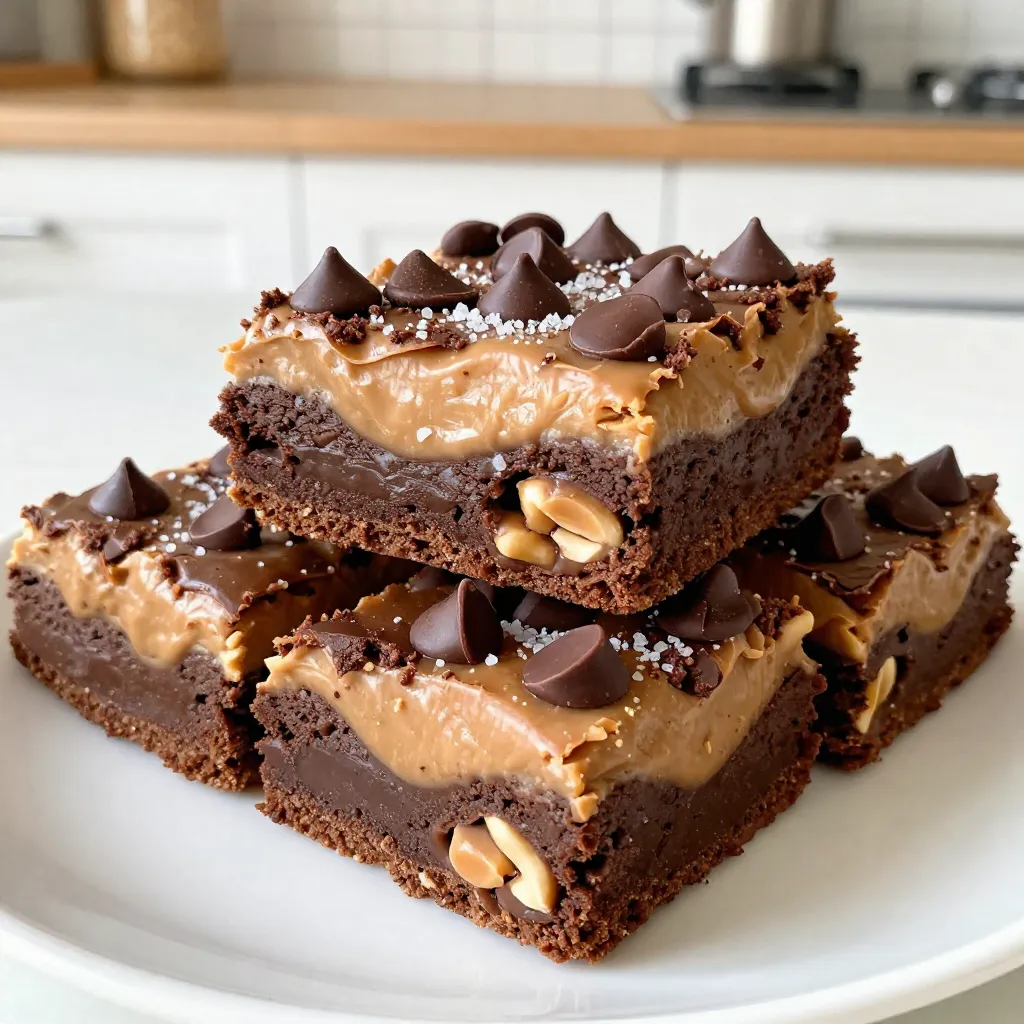
Are you ready to indulge in a sweet treat that combines rich brownies with creamy peanut butter cups? Look no further! My Peanut Butter Cup Brownie Bars are the perfect dessert for any occasion. They’re easy to make, taste delicious, and will satisfy any sweet tooth. Join me as I share step-by-step instructions, handy tips, and creative variations to elevate your baking game. Let’s dive into this tasty journey together!
Why I Love This Recipe
- Indulgent Flavor Combination: The rich chocolate brownie base paired with creamy peanut butter and crunchy peanut butter cups creates an irresistible blend of flavors that satisfies any sweet tooth.
- Easy to Make: This recipe requires simple ingredients and straightforward steps, making it accessible for both novice bakers and experienced ones looking for a quick treat.
- Perfect for Sharing: These brownie bars are great for gatherings, parties, or bake sales, as they cut easily into bars and are sure to impress guests with their decadent taste.
- Customizable Treat: Feel free to add different toppings like nuts or different types of chocolate chips, allowing you to personalize the recipe to suit your taste preferences.
Ingredients
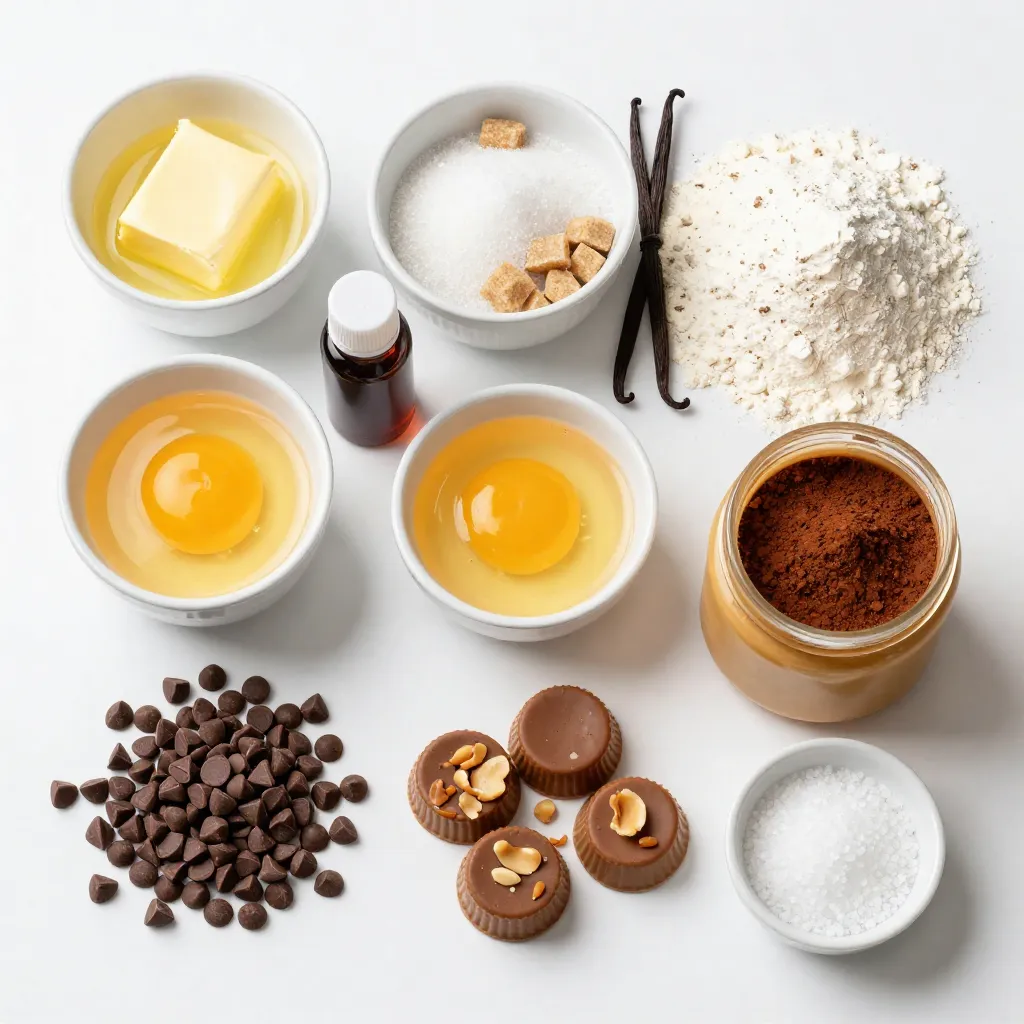
List of Ingredients
– 1 cup unsalted butter, melted
– 1 cup granulated sugar
– 1 cup brown sugar, packed
– 4 large eggs
– 2 teaspoons vanilla extract
– 1 cup all-purpose flour
– 1 cup unsweetened cocoa powder
– 1/2 teaspoon salt
– 1/2 teaspoon baking powder
– 1 cup peanut butter (creamy or crunchy)
– 1 cup mini peanut butter cups, chopped
– 1/2 cup chocolate chips (optional, for topping)
– Sea salt for sprinkling (optional)
Ingredient Substitutions
You can swap unsalted butter for coconut oil if you want a dairy-free option. For sugar, you might use coconut sugar instead of granulated sugar. If you need a gluten-free version, use gluten-free flour. You can also replace eggs with flax eggs (1 tablespoon ground flaxseed mixed with 2.5 tablespoons water per egg) for a vegan twist. Instead of mini peanut butter cups, try using chopped chocolate or other candy bars.
Tips for Freshness and Quality
Make sure your ingredients are fresh. Always check the expiration date on baking powder and flour. For the best flavor, use high-quality cocoa powder. When measuring flour, spoon it into your measuring cup and level it off. This prevents the brownies from being too dense. Store any leftover bars in an airtight container at room temperature for up to three days. For longer freshness, keep them in the fridge. Add sea salt right before serving for a nice touch.
Step-by-Step Instructions
Preparation and Baking Process
Start by preheating your oven to 350°F (175°C). This step is key to getting your brownie bars just right. Next, grease a 9×13 inch baking dish. Line it with parchment paper, leaving some paper hanging over the sides. This helps you lift the bars out easily later.
In a large bowl, whisk together 1 cup of melted butter, 1 cup of granulated sugar, and 1 cup of brown sugar. Mix until it looks smooth. Now, add 4 large eggs one by one. Mix well after each egg, then stir in 2 teaspoons of vanilla extract.
In another bowl, sift together 1 cup of all-purpose flour, 1 cup of cocoa powder, 1/2 teaspoon of salt, and 1/2 teaspoon of baking powder. Slowly add this dry mix to the wet mix. Fold gently until just combined.
Pour half of the brownie batter into your prepared dish. Spread it evenly. In a small bowl, mix 1 cup of peanut butter with a little warmed butter if needed. Drop dollops of this peanut butter mix over the brownie base.
Sprinkle 1 cup of chopped mini peanut butter cups over the peanut butter layer. Then, pour the rest of the brownie batter on top, spreading it out to cover everything. If you want, sprinkle some chocolate chips on top for extra flavor.
Bake for 25-30 minutes. The edges should set, and the center should look slightly sticky when you check with a toothpick.
Key Techniques for Perfect Brownie Bars
The key to a great brownie bar is not to overmix. When you fold the dry ingredients into the wet ingredients, do it gently. This keeps the bars soft and chewy. Also, let your butter cool a bit before mixing. If it’s too hot, it can cook the eggs, which isn’t good.
Another tip is to check for doneness carefully. You want the edges to be firm, but the center should still be soft. If you bake them too long, they will dry out.
Cooling and Serving Recommendations
Once your brownie bars are done, take them out of the oven. Let them cool in the pan for about 20 minutes. If you like, sprinkle some sea salt on top before they cool fully. This adds a nice touch.
Lift the bars out using the parchment paper. Place them on a wire rack to cool completely. Once cooled, cut them into bars. Serve them stacked on a cake stand or a wooden board. You can garnish with extra mini peanut butter cups or a light dusting of powdered sugar for a pretty finish.
Tips & Tricks
How to Achieve the Best Texture
To get the best texture in your peanut butter cup brownie bars, watch the baking time. Bake them until the edges are set but the center is soft. A toothpick should come out slightly sticky. This means they will be fudgy and not dry. Also, let them cool in the pan for a bit. This helps them set up nicely, making them easier to cut.
Common Mistakes to Avoid
Avoid overmixing the batter. When you mix too much, you make the brownies tough. Also, do not skip the sea salt if you want a richer flavor. It enhances the sweet and salty mix that makes these bars so good. Lastly, make sure to use fresh ingredients. Old baking powder can ruin the rise and texture.
Enhancing Flavor with Additional Ingredients
You can boost the flavor of your bars easily. Try adding different types of chocolate chips, like dark chocolate or white chocolate. You can also mix in nuts for a crunchy texture. If you love caramel, swirl it in with the peanut butter. This adds a nice twist to the taste. For a bit of spice, a dash of cinnamon can work wonders too!
Pro Tips
- Use Room Temperature Ingredients: Allow your eggs and peanut butter to come to room temperature for easier mixing and a smoother batter.
- Don’t Overmix: Once you add the dry ingredients to the wet, mix just until combined to keep your brownies fudgy.
- Check for Doneness: Use a toothpick to test; it should come out with a few moist crumbs for the perfect brownie texture.
- Let Them Cool: Allow the brownie bars to cool completely before cutting to achieve clean, neat edges.
Variations
Different Types of Peanut Butter Cups
You can use many kinds of peanut butter cups. Regular ones are a classic choice. Dark chocolate cups add a rich twist. White chocolate cups bring a creamy flavor. For a fun surprise, try using flavored peanut butter cups, like caramel or mint. Each type gives your brownie bars a new taste.
Adding Extra Toppings
You can dress up your brownie bars with extra toppings. A sprinkle of sea salt adds a nice touch. Chopped nuts like peanuts or almonds give crunch. You can also add a drizzle of melted chocolate on top. For a fruity twist, consider adding sliced strawberries or bananas. These toppings let you customize your dessert and impress your friends.
Flavor Swaps
Changing the flavors in your brownie bars can be fun. You can swap regular chocolate for flavored chocolate, like raspberry or espresso. This change can add a delightful surprise. If you like other nut butters, feel free to use them instead of peanut butter. Almond or cashew butter can create a unique taste. These simple swaps can turn your bars into a new treat every time!
Storage Info
Best Practices for Storage
To keep your Peanut Butter Cup Brownie Bars fresh, store them in an airtight container. Place parchment paper between layers to prevent sticking. Make sure they cool completely before sealing. This helps avoid sogginess and keeps them tasty.
How Long They Last
These brownie bars can last up to a week at room temperature. If you keep them in the fridge, they may last up to two weeks. Just remember to check for any signs of spoilage, like unusual smells or textures.
Freezing Instructions
You can freeze these bars for longer storage. Cut them into squares and wrap each piece tightly in plastic wrap. Then place the wrapped bars in a freezer bag. They will stay fresh for up to three months. When you’re ready to enjoy, let them thaw in the fridge overnight or at room temperature for a few hours.
FAQs
Can I make these bars gluten-free?
Yes, you can make these bars gluten-free. Simply replace all-purpose flour with a gluten-free flour blend. Make sure the blend is suitable for baking. This will keep the texture light and the taste delicious. Always check the labels to ensure all ingredients are gluten-free.
What is the best way to cut brownie bars?
To cut brownie bars, first, let them cool completely. Use the parchment paper to lift them from the pan. Place the brownies on a cutting board. Use a sharp knife for clean cuts. Wipe the knife with a damp cloth between cuts. This helps keep the edges neat.
How can I adjust sweetness levels?
To adjust sweetness, you can reduce the sugar in the recipe. Try using half a cup less of granulated and brown sugar. You could also add a touch of salt to balance the sweetness. If you like, use dark chocolate chips instead of milk chocolate for a richer taste.
You learned about making delicious peanut butter cup brownie bars. We covered the best ingredients, tasty tips, and key techniques to perfect your bars. Remember the importance of freshness and quality. I shared variations to inspire your creativity and how to store your bars for later enjoyment. If you follow these steps, you will impress everyone with your baking skills. Making these treats is fun and rewarding, so get started and enjo